Adsense

November 30, 2019

Queueable Apex - The middle way

The last post was a comparison between batch apex and @future apex. There are some advantage and disadvantage with both of them. When batch and @future needs to meet in between - queueable comes for rescue.

There are a few things that @future did not provide:
  1. @future requires the arguments be primitives, which means reconstructing a structure once the method is called.
  2. Difficult access to job ID. The executeBatch method returns a jobID, while calling an @future job does not give you the ID of the related job.
  3. No chaining - Chaining of batch apex is not allowed.
Q - Why we go for queueable Apex?
A - When the job such as extensive database operations or external Web service callouts is long running and is running asynchronously and you want to monitor the job status. It can be done via queueable apex and adding a job to the ApexJob queue. In this way, your asynchronous Apex job runs in the background in its own thread and doesn’t delay the execution of your main Apex logic.

Queueable jobs are similar to future methods in that they’re both queued for execution, but they provide you with these additional benefits.

Getting an ID for your job: When you submit your job by invoking the System.enqueueJob method, the method returns the ID of the new job. This ID corresponds to the ID of the AsyncApexJob record.
This ID helps you identify your job and monitor its progress, either through the Salesforce user interface in the Apex Jobs page, or programmatically by querying your record from AsyncApexJob.

Using non-primitive types: Your queueable class can contain member variables of non-primitive data types, such as sObjects or custom Apex types.

Chaining Jobs: In queueable you can also chain Jobs from a running job. It is very helpful if some processing needs to be done which depends on the last results.

Example:
This example is an implementation of the Queueable interface. The execute method in this example inserts a new account.

public class QueueableExample implements Queueable {

    public void execute(QueueableContext context) {
        Account acc = new Account(Name='Test Account Neeraj');
        Insert acc;     
    }
}

To add this class as a job on the queue, call this method:
ID jobID = System.enqueueJob(new QueueableExample());

After you submit your queueable class for execution, the job is added to the queue and will be processed when system resources become available. We can monitor the status of our job programmatically by querying AsyncApexJob or through the user interface Setup --> Monitor --> Jobs --> Apex Jobs.

Test class for queueable apex:

@isTest
public class AsyncExecutionExampleTest {
    static testmethod void testAccount() {
     
        Test.startTest();     
        System.enqueueJob(new QueueableExample());
        Test.stopTest();

        Account acct = [SELECT Name FROM Account WHERE Name='Test Account Neeraj' LIMIT 1];
        System.assertEquals('Test Account Neeraj', acct.Name);
    }
}

Few things can be noted here:

  • The execution of a queued job counts against the shared limit for asynchronous Apex method executions.
  • We can add up to 50 jobs to the queue with System.enqueueJob in a single transaction.
  • Use Limits.getQueueableJobs() to check how many queueable jobs have been added in one transaction.
  • No limit is enforced on the depth of chained jobs.
  • We can add only one job from an executing job with System.enqueueJob, that means only child job can exist for parent queueable job.

Read More »

November 24, 2019

Access Anypoint Platform in Anypoint Studio

Issue:

You can not access Anypoint Platform after configuring External Identity in Anypoint Studio.


Reason:

One of most common issues is the wrong Organization Domain configuration.


HowTo:

Please follow below steps to validate if the Organization domain is properly configured:

Open Anypoint Studio
Go to Window -->Preferences --> Anypoint Studio --> Authentication --> Add Button


Authentication Tab

 
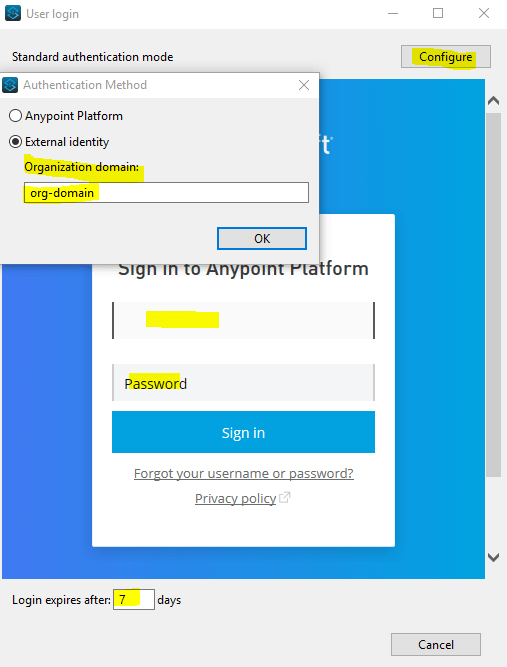
Now click on Configure --> Select External Identity

Provide your valid Organisation domain --> Select OK
Please validate your Organization domain field. The value must be your valid Organization domain.


add external identity


Once validated you can login your Anypoint Account with your user-id and password. You also can configure expires days.

Finally select Apply and Close button.


Happy Learning :)
Read More »

November 20, 2019

Configure Git plugin in Anypoint Studio

Objective

How to install Git plugin in Anypoint studio. 
The installation advantage of git plugin to Anypoint studio that you can do following things through AnypointStudio:


  • You can clone a existing Git repository.
  • Checkin your code to git repositories
  • Create a git repositories and many more...


Steps to Install Git Plugin to AnypointStudio

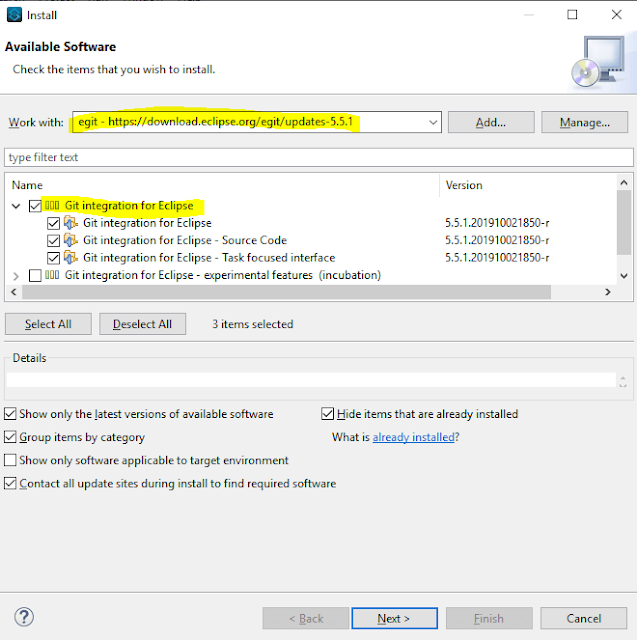
1. Go to http://wiki.eclipse.org/EGit/FAQ#Where_can_I_find_older_releases_of_EGit.3F,  and copy the "p2 repository URL"  for the Eclipse version you are using (or select the closest version to what you have installed)

2. In Studio, click the Help menu --> select Install New Software…


3. In the Work with field of the Available Software panel, click on Add button, and add a New name and the URL copied. Click ok


4. Select Git integration for Eclipse, and continue installation as normal.


install-git-plugin


After Installation you will need to restart your AnypointStudio and then you will find your Git plugin perspective. You can get from the quick search option as below:


git-perspective


or from Menu Bar
Window--> Perspective--> Open Perspective --> Other--> Select Git:


window-git-perspective


Happy Learning :)

Read More »

November 17, 2019

Munit coverage for APIKit flows Part2 - Mule4

In my previous articles How to generate Mule flow using RAML and MUnit complete coverage for ApiKit flows Part1 - Mule4 we have seen how Mule application can be generated using APIkit RAML and how we can test our routing flows using MUnit Test Suites.

Now here in this article we will see how to write MUnit test cases for flows that were created with APIkit RAML for APIKit Validation scenarios.


APIkit Router validates the incoming requests, HTTP methods, URI and URI parameter, header and query parameters against the structure or validation defined in RAML. It also routes the message to the respective flow and serials response. Message routing consists of incoming API requests to existing Mule flows and returning outgoing HTTP response codes to exceptions.


http-error-codes


Things to consider while writing MUnits for Validation flows:


set-bad-request-status-code

Above configuration is needed to validate HTTP response code. This you can configure as per your test scenarios.

After adding MUnit for APIKit Validation flows your MUnit coverage report has been increased as shown below:

munit-flow-coverage-report-extended


Please find sample Mule project in Github munit-for-apikit-flow-part2-mule4

Happy Learning :)


Read More »

November 14, 2019

Comparing JSON string payload to another JSON string - Mule4

In REST API Mule development in which system returns a JSON response, it is always advisable to write MUnit tests and assert the entire JSON response payload to avoid contract conflicts/mismatches.


Objective:

Our objective is loading expected JSON data from a file and comparing it with actual MUnit payload which we got from the tested flow.

Problem Description:

If You are using Mule 4 and seeing MUnit test fails comparing JSON string payload to another JSON string.
The application produces an output similar to below:
%dw 2.0
output application/json
---
{
  message: "Success PUT"
}

The sample payload below to compare for the MUnit test is saved in a file:
{"message":"Success PUT"}

After running your MUnit you may get similar error like below:

java.lang.AssertionError: The response payload is not correct! at file: [munit-for-apikit-flow-part2-mule4-apikit-test.xml], line: [22]
Expected: "{\"message\":\"Success PUT\"}" as String {class: "java.lang.String"}
     but: "{\n  \"message\": \"Success PUT\"\n}" as String {encoding: "UTF-8", mediaType: "application/java; charset=UTF-8", mimeType: "application/java", class: "java.lang.String", contentLength: 30} at (root)

at org.hamcrest.MatcherAssert.assertThat(MatcherAssert.java:20)


Problem Solution:

Use "readUrl" function to compare both types as JSON with JSON:

<munit-tools:assert-that expression="#[%dw 2.0 output application/json ---payload]" is='#[MunitTools::equalTo(readUrl("classpath://scaffolder/response/put_201_apikit-put_application_json.json", "application/json"))]' message="The response payload is not correct!" doc:name="Assert That - Payload is Expected" doc:id="bb6653e2-3022-4644-9099-204d13a5fce6"/>
   

Please find sample Mule project in Github munit-for-apikit-flow-part1-mule4

Happy Learning :)
Read More »

November 10, 2019

MUnit coverage for APIKit flows Part1 - Mule4

In my last article How to generate Mule flow using RAML.
Now here in this article we will see how to write MUnit test cases for flows that were created with APIkit RAML.

Application takes a RAML file and maps it to an implementation of an API in Mule.


We will see the implementation routes that handles incoming request based on Http methods (GET, POST, PUT, DELETE) and URL using MUnit.


Now let's start writing MUnits for routing flows:


Step 1: Generate Munit Flow from Apikit Flow: 


Right click on APIKit router-->Create Test Suite for Munit

create-munit-flows


Step 2: Run MUnit Suite:

Right click Munit flow--> select Run MUnit suite

run-munit-suite


Step 3: Flow execution sequence

Please check your MUnit test configuration if your MUnit is not behaving properly. Enable flow sources must be configured to List of Flows section as shown below:
enable-munit-flow

Then MUnit will find the source and will execute the test accordingly.

normal-flow-execution-sequence

Step 4: Coverage report:

munit-coverage-studio-report


Please find sample Mule project in Github munit-for-apikit-flow-part1-mule4

After running MUnit you will get MUnit coverage report like shown above. But If you have noticed APIKit main flow is having very less coverage percentage and it only covers resource flows. So, how we can increase or get the MUnit coverage for APIKit main flow which includes exception handling processors?
error-flow-execution-sequence

For this you needed to write MUnit additionally to cover these scenario which I will explain in my next article.

Happy Learning :)
Read More »

November 05, 2019

Create APIKit project using raml-Mule4

In this article we will see how we can create or generate Mule 4 project using RAML.
We will also see how Mule flow responds in case of Success and Validation scenarios.

RAML stands for RESTful API Modeling Language

RAML (Rest API Modeling Language) is based on YAML format, which is used to design REST APIs. RAML provides various features, including standardization, re-usability, easy readability, and much more. RAML provides a structure to the API which is useful for developers to start development process and it also helps clients to understands the request and response structure outcomes before hand.

What RAML contains?

  • Endpoint URL with its Query parameters and URI parameters,
  • HTTP methods to which API is listening to (GET, POST, PUT, DELETE),
  • Request and response schema and sample message,
  • HTTP response code that an API will return (eg: 200, 400, 404, 415, 500).

Lets jump into code build:

Step 1: Download a sample RAML file link

Step 2: Create Mule project: From AnypointStudio
             GoTo File--> New --> Mule Project
  • Provide Project Name
  • Select Runtime
  • Import RAML file by specifying file location or URL
  • Click finish button

import-raml-anypointstudio


Step 3: Building and Running Mule Project

Right click on the project --> Run As --> Mule Application


run-mule-app


Step 4: Test your deployed App through API Console


API-console

Step 5: Check Success Scenario

Success Test through API console

Flow execution sequence in Success Scenario
In API console, When we click on "GET"
  • Request will be sent to HTTP listener endpoint.
  • HTTP listener takes the request and forwards to APIKit router
  • APIKit validates the incoming requests and passes it to designated flow.
  • Here it is passing to "get:\apikit-login:apikit-raml-flow-Mule4-config" flow
  • Request is processed and gives a 200 OK response.
Success response flow


Step 6: Check Error Scenario

Error Test through API console

Flow execution sequence in Error Scenario(Bad Request)
On Api Console, When we execute DELETE operation.
  • Enter incorrect value in Delete Id.
  • Request will receive to HTTP endpoint and forwards to APIKit router.
  • APIKit router validates the incoming request.
  • On validation failed APIKit throws an error and which is caught by error handler.
  • Error handler passes the flow execution to APIKIT:BAD_REQUEST scope and gives response with  status code 400
Error response flow

Below are some error codes and their meanings which we normally uses in our development.
HTTP Error Code List Description

Please find sample Mule project in Github raml-apikit-flow-mule4

Next article we will see how to write MUnit test cases for these APIKit flows - Part 1


Read More »