Adsense

Showing posts with label MuleSoftLab. Show all posts

April 05, 2020

Munit validation for Multipart message - Mule4


In this article, I will try to show how we can write and execute MUnit validation for Multipart messages.

Mulesoft provide functions for creating MultiPart and formats and parts (including fields and boundaries) of MultiPart formats.

Below header needs to be added while using dataweave scripts to create multipart messages.

%dw 2.0
import dw::module::Multipart
output multipart/form-data


You will find a github link for sample project at the end of this article.

Now let us understand how we can parse and validate Multipart messages using Munit.

Multipart message formats doesn't provide flexibility for normal traversing to validate the transformation or output. To validate multipart message we need to transform the message with "application/java" format as highlighted below.

%dw 2.0 output application/java input payload multipart/form-data --- payload.parts


Validate size with function sizeOf():


Validate content:


https://github.com/manishkumarsah/multipart-munit-validation-mule4

Happy Learning :)
Read More »

December 05, 2019

Anypoint MQ Circuit Breaker - Mule4

In integration development there are lot of patterns that we can follow based on project requirements. Circuit Breaker is one of them.
In this article we will see how Circuit Breaker can be used and what we should consider while implementing it. 

Circuit breaker design pattern is used when:

  • To handle error scenarios and message reprocessing strategy.


Mulesoft has provided circuit breaker capability with Anypoint MQ component.
You can add dependency inside your pom as below:

<dependency>
<groupId>com.mulesoft.connectors</groupId>
<artifactId>anypoint-mq-connector</artifactId>
<version>3.1.0</version>
<classifier>mule-plugin</classifier>
</dependency>

Now, I will show you how you can design and configure your mule flows for implementing Circuit Breaker capability.


Below is the sample circuit breaker mule flow design:


flow-design-circuit-breaker

We will explain each and every part the above flow design below:


Circuit Breaker Configuration:

Go to global elements section create a Circuit breaker configuration as below:


circuit-breaker-configuration


This configuration can be shared across multiple Subscriber resources in the project.
On Error Types – Type of Errors based on which you want to Open the Circuit.
Errors Threshold – No. of Failures in Succession – Ex: 5
Trip Timeout – Duration to keep the Circuit Open once the ErrorThreshold is reached – Ex: 60 Minutes


Subscriber Configuration

Anypoint MQ Subscriber Source provides Circuit Breaking Capability.
                                                       
subscriber-circuit-breaker-config

 
1. Select the Anypoint MQ Subscriber Source.
2. Click on the Advanced tab.
3. Provide the Circuit Breaker from Global Reference.


AMQ Message Processing\Listening Strategy:


amq-subscriber-configuration


This section describes the methodology how we are going to follow to process messages from Anypoint MQ. This process helps in effectively handling reprocessing and retrying scenarios and also simplifies the process from a maintenance perspective.


Steps:

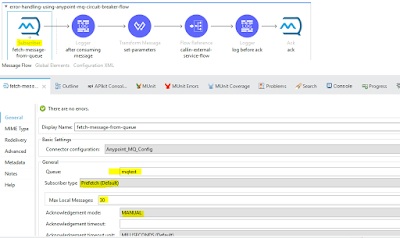
  1. Configure the Subscribe processor
  2. Subscriber Type – Prefetch
  3. Max Local Messages –  default it to 5, you can change based on requirement for further tuning.
  4. Acknowledgment Mode – Set to MANUAL, As the Acknowledgement Mode is set to MANUAL, we need to Ack the message post successful completion of the flow. So that the message doesn’t get retried/consumed.


Circuit Breaker and AMQ Listening Strategy both need to be configured in our components where we want messages to be reprocessed and retried in a configurable manner.

In case of Error Scenarios,


error-propagate-type

Based on your requirement you can catch the error and subsequent to Error Handling, Nack the message so that the message stays on the queue and will be subsequently redelivered.


nack-token-vars


You can use Ack the message so that the message is removed from the queue in case of success scenarios.


ack-token-vars

This ackToken you can store in variable which can be used for Ack/Nack of the message.


set-attributes


MQ messages stores in queue after getting Nack

mq-msg-properties-details


Please find sample Mule project in Github Error-Handling-using-Anypoint-MQ-Circuit-Breaker
Read More »

November 17, 2019

Munit coverage for APIKit flows Part2 - Mule4

In my previous articles How to generate Mule flow using RAML and MUnit complete coverage for ApiKit flows Part1 - Mule4 we have seen how Mule application can be generated using APIkit RAML and how we can test our routing flows using MUnit Test Suites.

Now here in this article we will see how to write MUnit test cases for flows that were created with APIkit RAML for APIKit Validation scenarios.


APIkit Router validates the incoming requests, HTTP methods, URI and URI parameter, header and query parameters against the structure or validation defined in RAML. It also routes the message to the respective flow and serials response. Message routing consists of incoming API requests to existing Mule flows and returning outgoing HTTP response codes to exceptions.


http-error-codes


Things to consider while writing MUnits for Validation flows:


set-bad-request-status-code

Above configuration is needed to validate HTTP response code. This you can configure as per your test scenarios.

After adding MUnit for APIKit Validation flows your MUnit coverage report has been increased as shown below:

munit-flow-coverage-report-extended


Please find sample Mule project in Github munit-for-apikit-flow-part2-mule4

Happy Learning :)


Read More »

November 10, 2019

MUnit coverage for APIKit flows Part1 - Mule4

In my last article How to generate Mule flow using RAML.
Now here in this article we will see how to write MUnit test cases for flows that were created with APIkit RAML.

Application takes a RAML file and maps it to an implementation of an API in Mule.


We will see the implementation routes that handles incoming request based on Http methods (GET, POST, PUT, DELETE) and URL using MUnit.


Now let's start writing MUnits for routing flows:


Step 1: Generate Munit Flow from Apikit Flow: 


Right click on APIKit router-->Create Test Suite for Munit

create-munit-flows


Step 2: Run MUnit Suite:

Right click Munit flow--> select Run MUnit suite

run-munit-suite


Step 3: Flow execution sequence

Please check your MUnit test configuration if your MUnit is not behaving properly. Enable flow sources must be configured to List of Flows section as shown below:
enable-munit-flow

Then MUnit will find the source and will execute the test accordingly.

normal-flow-execution-sequence

Step 4: Coverage report:

munit-coverage-studio-report


Please find sample Mule project in Github munit-for-apikit-flow-part1-mule4

After running MUnit you will get MUnit coverage report like shown above. But If you have noticed APIKit main flow is having very less coverage percentage and it only covers resource flows. So, how we can increase or get the MUnit coverage for APIKit main flow which includes exception handling processors?
error-flow-execution-sequence

For this you needed to write MUnit additionally to cover these scenario which I will explain in my next article.

Happy Learning :)
Read More »

November 05, 2019

Create APIKit project using raml-Mule4

In this article we will see how we can create or generate Mule 4 project using RAML.
We will also see how Mule flow responds in case of Success and Validation scenarios.

RAML stands for RESTful API Modeling Language

RAML (Rest API Modeling Language) is based on YAML format, which is used to design REST APIs. RAML provides various features, including standardization, re-usability, easy readability, and much more. RAML provides a structure to the API which is useful for developers to start development process and it also helps clients to understands the request and response structure outcomes before hand.

What RAML contains?

  • Endpoint URL with its Query parameters and URI parameters,
  • HTTP methods to which API is listening to (GET, POST, PUT, DELETE),
  • Request and response schema and sample message,
  • HTTP response code that an API will return (eg: 200, 400, 404, 415, 500).

Lets jump into code build:

Step 1: Download a sample RAML file link

Step 2: Create Mule project: From AnypointStudio
             GoTo File--> New --> Mule Project
  • Provide Project Name
  • Select Runtime
  • Import RAML file by specifying file location or URL
  • Click finish button

import-raml-anypointstudio


Step 3: Building and Running Mule Project

Right click on the project --> Run As --> Mule Application


run-mule-app


Step 4: Test your deployed App through API Console


API-console

Step 5: Check Success Scenario

Success Test through API console

Flow execution sequence in Success Scenario
In API console, When we click on "GET"
  • Request will be sent to HTTP listener endpoint.
  • HTTP listener takes the request and forwards to APIKit router
  • APIKit validates the incoming requests and passes it to designated flow.
  • Here it is passing to "get:\apikit-login:apikit-raml-flow-Mule4-config" flow
  • Request is processed and gives a 200 OK response.
Success response flow


Step 6: Check Error Scenario

Error Test through API console

Flow execution sequence in Error Scenario(Bad Request)
On Api Console, When we execute DELETE operation.
  • Enter incorrect value in Delete Id.
  • Request will receive to HTTP endpoint and forwards to APIKit router.
  • APIKit router validates the incoming request.
  • On validation failed APIKit throws an error and which is caught by error handler.
  • Error handler passes the flow execution to APIKIT:BAD_REQUEST scope and gives response with  status code 400
Error response flow

Below are some error codes and their meanings which we normally uses in our development.
HTTP Error Code List Description

Please find sample Mule project in Github raml-apikit-flow-mule4

Next article we will see how to write MUnit test cases for these APIKit flows - Part 1


Read More »

October 31, 2019

Running MUnit for single file flow and Tags-Mule4

In this Article we will see how to run single munit at a time through command line and from Anypoint studio.

Also we will see how to run MUnits using Tags from command line


Execute from Command Line

Using "mvn test" at the terminal will test all MUnit tests, but here we describe how to test only one MUnit file

Run the following command at the project root folder.


In the following example, the MUnit test file is called run-single-munit-test-suite.xml


mvn clean test -Dmunit.test=run-single-munit-test-suite.xml


Running Single MUnit test case

XML file contains several tests, you may add the test name like this:

mvn clean test -Dmunit.test=abc.xml#testName

mvn clean test -Dmunit.test=mvn clean test -Dmunit.test=run-single-munit-test-suite.xml#run-single-munit-test-suite-run-single-munitFlowTest
  
In this case, the "testName" is the name of the test to be executed.


Execute from AnypointStudio

Right click in Munit file --> Run MUnit suite
Run MUnit suite


Right click on test Name--> Run MUnit test
Run MUnit test


Running Munit using Tags CommandLine

Tags are important to categorize the MUnits that needs to be executed based on the requirement. It is more like developer friendly to execute the different test scenarios.

Munit Tags

mvn clean test -Dmunit.tags=flow

Above command will run all the munit tests tagged as name "flow"

You can also use combination as below:

mvn clean test -Dmunit.test=run-single-munit-test-suite.xml -Dmunit.tags=flow

Please find sample Mule project in Github run-single-munit-Mule4

Happy learning :)

Read More »

October 25, 2019

Exclude flows/files from MUnit coverage


In MuleSoft development before deploying our Mule applications and APIs we write test cases for unit and integration testing. 

MUnit is a Mule testing framework that lets you easily automate testing Mule applications, using both unit and integration tests. MUnit also provides a set of tools, such as a message processor mocking framework that lets you test units of code in actual isolation. 
It helps us to generate coverage reports automatically.

In some of the scenarios if you want to skip flows and files from the coverage reports.
The procedure varies slightly depending on the type of test that you are trying to skip in the coverage report.

Ignoring Flows: 

If you are trying to ignore a flow, you can add the following piece of code in the POM file:


<coverage>
  <ignoreFlows>
      <ignoreFlow>flow-name</ignoreFlow>
  </ignoreFlows>
</coverage>


Ignoring File:

If you want to remove a file from your Coverage report, you can add the following piece of code in the POM file:

<coverage> 
     <ignoreFiles>
          <ignoreFile>file-name.xml</ignoreFile> 
     </ignoreFiles> 
</coverage>


Note: 

Please keep in mind that the coverage tag must be included in the Mule Maven plugin configuration tag. For example:

<plugins>
  <plugin>
    <groupId>com.mulesoft.munit.tools</groupId>
    <artifactId>munit-maven-plugin</artifactId>
    <configuration>
      ...
      <coverage>
       ...
      </coverage>
      ...
    </configuration>
  </plugin>
</plugins>


The steps mentioned in this article are only useful for terminal console.


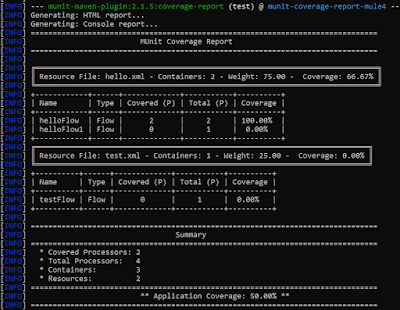
Coverage report with ignore tags: mvn clean install


Coverage report with ignore tags


Coverage report without ignore tags: mvn clean install

Coverage report without ignore tags


Ignore MUnit from command line

mvn clean package -DskipTests

or 

you can add skip test configuration inside pom as below:
<plugins>
  <plugin>
      <groupId>com.mulesoft.munit.tools</groupId>
      <artifactId>munit-maven-plugin</artifactId>
      <configuration>
      ...
      <skipMunitTests>true</skipMunitTests>
      ...
    </configuration>
  </plugin>
</plugins>


Please find sample Mule project in Github Munit coverage report mule4

Happy learning :)
Read More »

October 10, 2019

Use secure properties in dataweave 2

We have seen In Mule 4 Secure Configuration Properties Module that can be used to encrypt properties files or individual properties. In this article, we will see how to use Secure properties inside DataWeave 2 or in Mule 4 expression statements.

Things to know: If you need to see how to configure your Mule project to use the Secure Configuration Properties Module, and Encrypt Properties, I recommend you read the my article securing-configuration-properties-in-mule.


Once you have Secure Properties configured, you can read secure properties inside your xml configuration by prefixing secure:: namespace before the property name.


Use of secure prop in global property: 

<global-property name="prop" value="my-${secure::property.key}"/>


Use of Secure prop in Flow

<flow name="test-flow">
    <set-payload value="${secure::encrypted.key}"/>
</flow>

Now, What about using it in DataWeave 2?


If you have used properties in DataWeave 1, you would know about a special function p(prop_name) that can be used inside DataWeave 1 script to read properties. The same function is available in Mule 4 and DataWeave 2.


Using in Expression:

<global-property name="prop" value="#[p('secure::encrypted.key')]"/>

Using in DataWeave 2.0:

%dw 2.0
output application/java
---
{
password: p('secure::encrypted.key')
}

Please find the sample Mule project in Github here


Happy learning :)
Read More »

October 01, 2019

How to format dates using DataWeave 2

In this article we will see how to format dates as String in DataWeave 2. This is something generic code which you can use for your date transformations in dataweave 2.

For example, lets say we want the output in the format "yyyy-MM-dd'T'HH:mm:ss.SSS" to "yyyy-MM-dd"


Please find snippet below:

%dw 2.0 
output application/json 
fun format(df: DateTime) = df as String {format: "yyyy-MM-dd"} 
--- 

    CreatedDateTime: format("2019-02-13T13:23:00.120Z")

}

Some sample transformation preview from Anypoint studio:


Anypoint, dataweave, dataweave 2, dwl, Middleware, Mule 4, MuleCode, MuleLab, MuleProject, MuleSoft, Studio, transformation,


Anypoint, dataweave, dataweave 2, dwl, Middleware, Mule 4, MuleCode, MuleLab, MuleProject, MuleSoft, Studio, transformation,


You can check more information about date functions used in dataweave 2 here

Moreover, regarding date patterns when you need to format a Date as a String you using the same Java patterns as for the DateTimeFormatterBuilder 


Please find the sample Mule project here


Read More »