Adsense

Showing posts with label HowTo. Show all posts

January 17, 2021

How to exclude files from deployment - Mule4

Hello Friends,

In this article, I want to show to you how you can skip or exclude flow from initialize and start while deploying mule 4 applications in local or in cloud. Also, I will show you how you can exclude files from packaging jars.

Problem: 

In mulesoft development there are high chance of having large number of files for flows/ subflows and due to this it leads to:
  • Long build and deployment time.
  • Bulk packaging.

Above scenarios are more painful when we need a quick fix and testing of code in local or in cloud environment.


Let's check scenario below, as we are able to see in project below we have three files under src/main/mule package. Each file is having individual flows as highlighted in picture below:


mule4-flows


In mule4, we have "mule-artifact.json" file where we can declare files to be considered for initializing and starting of the flows under configs tag. By default, if we don't declare any file names, Mule runtime includes All files to check, initialize and starting of the flows.


mule-artifact-json.png


Below logs shows only "HelloWorldFlow" is initialized and started for deployment.

flow-logs


So, if we don't declare any file to include for execution, below logs shows mule runtime started and initialized all flows from all files.
flow-logs


Although above configuration helps you to exclude flows to initiate and start while deploying application in local or in cloud. It helps to reduce total deployment time of mule apps. But with above configuration you will not be able to exclude files or folders from packaging jar.


How to exclude files or folders from packaging jars?


To achieve this, we need to create "_muleExclude" file at the root level of mule application.


_muleExclude-mule4.png


You can declare file names to exclude from packaging jar as shown above.
Above picture also shows extracted jars is not having files included inside "_muleExclude" file.

Note: Please make sure above configurations should be used wisely as it may lead to application failure.

If you want to know more about minMuleVersion you can check my article runtime-patching-in-mule-munit


Happy Learning :)
Read More »

December 22, 2020

How to pass payload using Get method-Mule4

Hello Friends, 

I recently worked for one of API implementation where I needed to encrypt and send/receive one or more field in queryParms/headers while calling Get operation to external system.

As per API standard Get method should not pass payload as body while calling any Apis or 3rd party systems. Get method supports Uri Params, Query Params or Header Attributes.

In this article, I will show you the technique how you can pass encrypted payload using Http Get method. This is one of tricky interview question which normally asked in Mulesoft or Api Design related interviews.

As we know the when we encrypt any value it will not be a single string. Encrypted value may be of be multiple line as given below for PGP encryption for value 123456

-----BEGIN PGP MESSAGE-----
Version: BCPG v1.58

hIwDmCS94uDDx9kBA/9NIO0Kq9+yhXBLQveoykVjbECqXnGM8DargSsBxE2xBLQP
000W7mre5YpeSRJi4dvjVkAKPaxIFJhHlUNv38i5DkGD/z53SKtbKfYdfT+3oHT4
SVnIkcqWM+i+xawrKSk8Lz+j5GaJZ+wQrrxi8TP9RVW+wZlcbBNfxZVShDYp8dJX
AX9/x+1dFyO0EtHBipB0MLOqrb+sua028HGcg7E/sptn89JAgUcNEXOurVSfN6Ws
P/KxUMQY9+KKQQKavJ6LC92a6GJhVk4S+cnY1sxDLGtqKcGd+qCd
\u003dwGi2
-----END PGP MESSAGE-----


For both scenario(send/receive) we will be using (dw::core::Binaries) module from dataweave

toBase64(Binary): String


It takes Binary as input and returns result as base64 encoded String.

encoding
base64 Encoding


fromBase64(String): Binary


It takes base64 encoded String and returns original Binary data as a result.

decoded
base64 decoding


In this article we have seen how to convert encrypted payload to base64 encoded string and vice-versa. We can do the same conversion and pass with other payload type like JSON/XML etc..
These two dataweave functions are quite useful while dealing with payload with GET method.


Happy Learning :)
Read More »

November 24, 2019

Access Anypoint Platform in Anypoint Studio

Issue:

You can not access Anypoint Platform after configuring External Identity in Anypoint Studio.


Reason:

One of most common issues is the wrong Organization Domain configuration.


HowTo:

Please follow below steps to validate if the Organization domain is properly configured:

Open Anypoint Studio
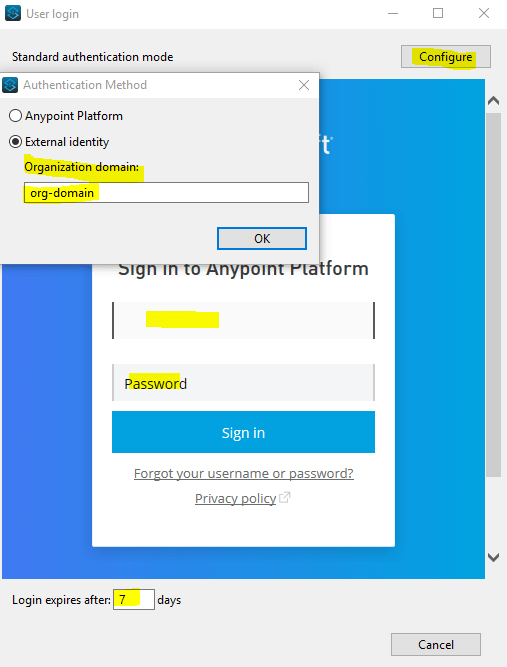
Go to Window -->Preferences --> Anypoint Studio --> Authentication --> Add Button


Authentication Tab

 
Now click on Configure --> Select External Identity

Provide your valid Organisation domain --> Select OK
Please validate your Organization domain field. The value must be your valid Organization domain.


add external identity


Once validated you can login your Anypoint Account with your user-id and password. You also can configure expires days.

Finally select Apply and Close button.


Happy Learning :)
Read More »

November 20, 2019

Configure Git plugin in Anypoint Studio

Objective

How to install Git plugin in Anypoint studio. 
The installation advantage of git plugin to Anypoint studio that you can do following things through AnypointStudio:


  • You can clone a existing Git repository.
  • Checkin your code to git repositories
  • Create a git repositories and many more...


Steps to Install Git Plugin to AnypointStudio

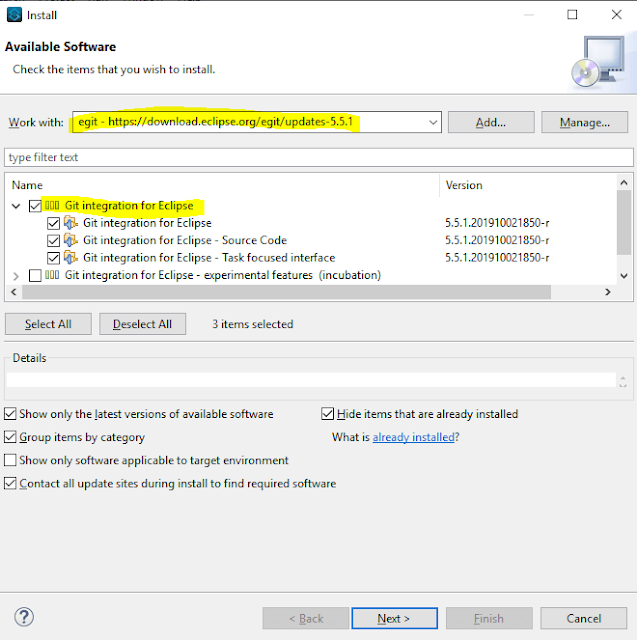
1. Go to http://wiki.eclipse.org/EGit/FAQ#Where_can_I_find_older_releases_of_EGit.3F,  and copy the "p2 repository URL"  for the Eclipse version you are using (or select the closest version to what you have installed)

2. In Studio, click the Help menu --> select Install New Software…


3. In the Work with field of the Available Software panel, click on Add button, and add a New name and the URL copied. Click ok


4. Select Git integration for Eclipse, and continue installation as normal.


install-git-plugin


After Installation you will need to restart your AnypointStudio and then you will find your Git plugin perspective. You can get from the quick search option as below:


git-perspective


or from Menu Bar
Window--> Perspective--> Open Perspective --> Other--> Select Git:


window-git-perspective


Happy Learning :)

Read More »

November 05, 2019

Create APIKit project using raml-Mule4

In this article we will see how we can create or generate Mule 4 project using RAML.
We will also see how Mule flow responds in case of Success and Validation scenarios.

RAML stands for RESTful API Modeling Language

RAML (Rest API Modeling Language) is based on YAML format, which is used to design REST APIs. RAML provides various features, including standardization, re-usability, easy readability, and much more. RAML provides a structure to the API which is useful for developers to start development process and it also helps clients to understands the request and response structure outcomes before hand.

What RAML contains?

  • Endpoint URL with its Query parameters and URI parameters,
  • HTTP methods to which API is listening to (GET, POST, PUT, DELETE),
  • Request and response schema and sample message,
  • HTTP response code that an API will return (eg: 200, 400, 404, 415, 500).

Lets jump into code build:

Step 1: Download a sample RAML file link

Step 2: Create Mule project: From AnypointStudio
             GoTo File--> New --> Mule Project
  • Provide Project Name
  • Select Runtime
  • Import RAML file by specifying file location or URL
  • Click finish button

import-raml-anypointstudio


Step 3: Building and Running Mule Project

Right click on the project --> Run As --> Mule Application


run-mule-app


Step 4: Test your deployed App through API Console


API-console

Step 5: Check Success Scenario

Success Test through API console

Flow execution sequence in Success Scenario
In API console, When we click on "GET"
  • Request will be sent to HTTP listener endpoint.
  • HTTP listener takes the request and forwards to APIKit router
  • APIKit validates the incoming requests and passes it to designated flow.
  • Here it is passing to "get:\apikit-login:apikit-raml-flow-Mule4-config" flow
  • Request is processed and gives a 200 OK response.
Success response flow


Step 6: Check Error Scenario

Error Test through API console

Flow execution sequence in Error Scenario(Bad Request)
On Api Console, When we execute DELETE operation.
  • Enter incorrect value in Delete Id.
  • Request will receive to HTTP endpoint and forwards to APIKit router.
  • APIKit router validates the incoming request.
  • On validation failed APIKit throws an error and which is caught by error handler.
  • Error handler passes the flow execution to APIKIT:BAD_REQUEST scope and gives response with  status code 400
Error response flow

Below are some error codes and their meanings which we normally uses in our development.
HTTP Error Code List Description

Please find sample Mule project in Github raml-apikit-flow-mule4

Next article we will see how to write MUnit test cases for these APIKit flows - Part 1


Read More »

October 25, 2019

Exclude flows/files from MUnit coverage


In MuleSoft development before deploying our Mule applications and APIs we write test cases for unit and integration testing. 

MUnit is a Mule testing framework that lets you easily automate testing Mule applications, using both unit and integration tests. MUnit also provides a set of tools, such as a message processor mocking framework that lets you test units of code in actual isolation. 
It helps us to generate coverage reports automatically.

In some of the scenarios if you want to skip flows and files from the coverage reports.
The procedure varies slightly depending on the type of test that you are trying to skip in the coverage report.

Ignoring Flows: 

If you are trying to ignore a flow, you can add the following piece of code in the POM file:


<coverage>
  <ignoreFlows>
      <ignoreFlow>flow-name</ignoreFlow>
  </ignoreFlows>
</coverage>


Ignoring File:

If you want to remove a file from your Coverage report, you can add the following piece of code in the POM file:

<coverage> 
     <ignoreFiles>
          <ignoreFile>file-name.xml</ignoreFile> 
     </ignoreFiles> 
</coverage>


Note: 

Please keep in mind that the coverage tag must be included in the Mule Maven plugin configuration tag. For example:

<plugins>
  <plugin>
    <groupId>com.mulesoft.munit.tools</groupId>
    <artifactId>munit-maven-plugin</artifactId>
    <configuration>
      ...
      <coverage>
       ...
      </coverage>
      ...
    </configuration>
  </plugin>
</plugins>


The steps mentioned in this article are only useful for terminal console.


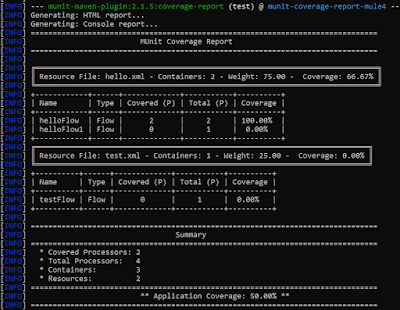
Coverage report with ignore tags: mvn clean install


Coverage report with ignore tags


Coverage report without ignore tags: mvn clean install

Coverage report without ignore tags


Ignore MUnit from command line

mvn clean package -DskipTests

or 

you can add skip test configuration inside pom as below:
<plugins>
  <plugin>
      <groupId>com.mulesoft.munit.tools</groupId>
      <artifactId>munit-maven-plugin</artifactId>
      <configuration>
      ...
      <skipMunitTests>true</skipMunitTests>
      ...
    </configuration>
  </plugin>
</plugins>


Please find sample Mule project in Github Munit coverage report mule4

Happy learning :)
Read More »

October 10, 2019

Use secure properties in dataweave 2

We have seen In Mule 4 Secure Configuration Properties Module that can be used to encrypt properties files or individual properties. In this article, we will see how to use Secure properties inside DataWeave 2 or in Mule 4 expression statements.

Things to know: If you need to see how to configure your Mule project to use the Secure Configuration Properties Module, and Encrypt Properties, I recommend you read the my article securing-configuration-properties-in-mule.


Once you have Secure Properties configured, you can read secure properties inside your xml configuration by prefixing secure:: namespace before the property name.


Use of secure prop in global property: 

<global-property name="prop" value="my-${secure::property.key}"/>


Use of Secure prop in Flow

<flow name="test-flow">
    <set-payload value="${secure::encrypted.key}"/>
</flow>

Now, What about using it in DataWeave 2?


If you have used properties in DataWeave 1, you would know about a special function p(prop_name) that can be used inside DataWeave 1 script to read properties. The same function is available in Mule 4 and DataWeave 2.


Using in Expression:

<global-property name="prop" value="#[p('secure::encrypted.key')]"/>

Using in DataWeave 2.0:

%dw 2.0
output application/java
---
{
password: p('secure::encrypted.key')
}

Please find the sample Mule project in Github here


Happy learning :)
Read More »

October 03, 2019

Install Anypoint Security Suite

Goal: In this article we will see how to install Anypoint security suite through AnypointStudio and we will get to know what we can achieve after installing this security suite. This feature doesn't comes with AnypointStudio downloaded version.

Anypoint Enterprise Security is a collection of security features that enforce secure access to information in Mule applications. 


Anypoint Enterprise Security suite helps application developers to develop security solutions as per security requirements, prevent security breaches and facilitate authorized access to data. The following security features bridge gaps between trust boundaries in applications:


  • Mule Secure Token Service (STS) OAuth 2.0 Provider
  • Mule Credentials Vault
  • Mule Message Encryption Processor
  • Mule Digital Signature Processor
  • Mule Filter Processor
  • Mule CRC32 Processor


Steps to install Anypoint Security Suite


Step 1: Open Anypoint Studio -> Go to Help -> Select Install New Software


Anypoint Install New Software


Step 2: Click the Add button and it will open a window

Provide Name as: Anypoint Enterprise Security


Location as: http://security-update-site-1.4.s3.amazonaws.com


Click OK


Anypoint Available Software


Step 3: Go to the Work With drop down


Now you can see Anypoint Enterprise Security - http://security-update-site-1.4.s3.amazonaws.com in the dropdown list. Select it and select the Premium checkbox -> click Next


Select Available Software Anypoint


Check for available software


Again click Next, accept the ‘terms of license agreement’ and then click Finish.

Anypoint Install review license


Step 4: Restart AnypointStudio.

Now you will be able to use the security features given above.

Happy Learning :)
Read More »

September 25, 2019

Update Anypoint Studio version

This article is for updating your AnypointStudio Version and Syncup with the latest studio release without a fresh download from Mulesoft anypoint studio site.


There are following benefits:


  • We do not need to do a fresh studio download to continue our development.
  • Whatever the existing plugins you have added previously, you do not need to install it again. It will be available after restart.

Steps for updating your AnypointStudio version:


Go to Help--> Select About Anypoint Studio


About Anypoint Studio


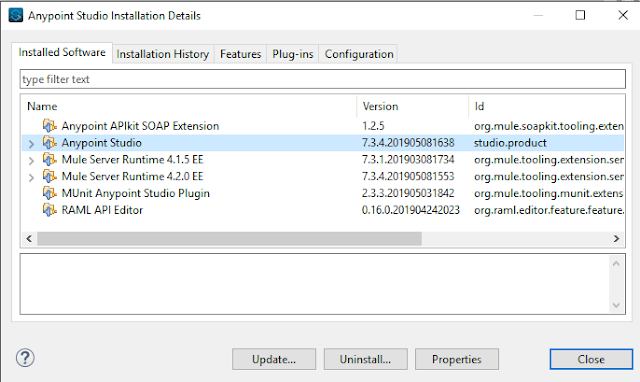
Click on Installation Details


Anypoint Studio Version


Select Anypoint Studio and click Update Button


Anypoint Installation Details


Click Next


Anypoint-Update-Remediation-Page

Click Next


Anypoint-Update-Details


Accept licence agreements and click finish


Accept-License


Wait to finish the Update and it will ask for restart--> Click restart now

Anypoint Installation Progress

Restart AnypointStudio


Once your AnypointStudio restarts you will get the updated studio version

AnypointStudio Version Updated


Also you will find the existing plugin there as you can see here it has git plugin after restart Anypoint Studio

AnyPoint Perspective


Happy Learning :)

Read More »