Adsense

Showing posts with label Mule3. Show all posts

December 12, 2020

Mulesoft Interview Questions With Answers - Part 1

Bonjour!

What is Mulesoft?

The first and the most basic question asked in Mulesoft developer interviews. 

Mulesoft is the vendor that provides an integration platform to help businesses connect data, applications, and devices.

Mule is the runtime engine of the Anypoint Platform. It is a lightweight Java-based enterprise service bus (ESB) that allows developers to connect applications and exchange data. It can connect any systems by using different protocols like HTTP, JMS, JDBC etc.


What is Anypoint Platform?

Anypoint platform is a hybrid integration platform which is highly productive, unified and helps to create a smooth distributed systems. It helps to manage full API lifecycles. It provides unified platform to deploy, manage, monitor and rapid development of apps into single place.


What is a Mule Application?

A Mulesoft application is a package of codes and files that runs inside Mule Runtime. Mulesoft application can be triggered with set of events that can be external and inside mulesoft. It can process events and route to next components or endpoints. Endpoints can be external system, another mulesoft application or local resources like file.

A Mule Application may consists of one or more flows, subflows and private flows.


What is the difference between Flow, Subflow, and Private flow?

Flow is a message/event processing block. It can have Mule sources (e.g. an HTTP listener) to trigger the execution of a flow. It can have its own processing strategy and error handling strategy.

Subflow is a scope that enables you to process messages synchronously. It doesn't have any source or error handling block. It inherits the processing strategy and error handling strategy from parent flow. It can be used to split common logic and reusability.

Private flow is a flow without a Mule source. It can be synchronous or asynchronous based on the processing strategy selected. They can have their own error handling strategy.

All three above can be called using a flow-ref. Source will be skipped while calling using flow-ref.


How Mule Applications can be build?

Mule application can be created using online flow-designer and offline by downloading Anypointsudio. 

Link for Online flow-designer

Link to download AnypointStudio


How Mule4 Application flow executes?

Mule4 application flows executes events in multiple threads. Mule4 automatically optimizes performance and uses thread switching and parallel processing if required.


Variables in Mule 4 vs Mule 3?

In Mule 3, we had three types of variables: Session variables, Record variables, and Flow variables.

In Mule 4, we only have Flow variables. These variables can be accessed using the keyword "vars".

Example:

vars.variableName


What is API-led connectivity?

API-led connectivity is a methodical way to connect applications to data through reusable APIs. APIs are created in three distinct layers: Experience, Process, and System.


API Life Cycle?

An API life cycle consists of 3 layers:


The first step towards API development is API Specification. This phase involves designing of the API based on the requirements of business. An API Specification is a blueprint of an API.

Anypoint Platform provides Design center to design API's REST interfaces.

The next phase is API Implementation. This phase involves actual implementation of the API.

Anypoint Platform provides Flow Designer which is a web based tool to create a prototype of the API.

Anypoint Studio is the IDE for development and testing of Mule applications. 

Final phase in API life cycle is API management, uses a tool named API manager on Anypoint Platform which is used to apply policies to secure APIs and restrict access. 


What are the advantages of API-led approach?

  • Mulesoft prefers Design first approach for API development that helps non-technical stakeholders easy to understand the API specs/contracts.
  • It simplifies the interface between Client and application by hiding complex details.
  • Business validation and contracts can be defined at API specification. So, developers don't need to invest time to write code for validation and error type checks.
  • It encourages "fail fast" approach which helps in fast and parallel development.
  • It encourages reusability of assets and collaboration across teams.
  • Apis can be mocked before implementation starts which helps early feedback and parallel development.
  • Mulesoft anypoint platform provides tools to write, publish, share and manage versions of API.


What is RAML?

RAML stands for RESTful (REpresentational State Transfer) API Modeling Language. It's a way of describing a RESTful API that is readable by both human and computers. 

They use https methods such as GET, PUT, POST, DELETE, etc.


Difference between URI parameters and Query parameters.

URI parameter is used to specify a specific resource whereas Query parameter is used to filter or sort those resources.

let's say we need to filter products based on productType, we use query parameters in this case:

GET: /products?productType=electronics

Let's consider another scenario where we need to retrieve particular product details, we use URI parameters in this case:

GET: /products/{productID}

here, productID will be replaced by a value.


Error Handling in Mule 4?

Error handling in Mule 4 is redesigned. It has three mechanisms to handle errors now.

1. On-Error Propagate:  In an On-error Propagate scope, when an error occurs, it terminates the current execution of flow and then throws the error to its parent flow where it's handled.

2. On-Error Continue: In case of an error in an On-error Continue scope, the execution of the flow continues as if successful sending a 200 OK response.

3. Try Catch scope: A Try Catch scope is used to handle errors on individual components. It is especially useful when you need to separate error handling strategies for different components in a flow.


What are the Logger levels?

There are 5 logger levels namely: DEBUG, ERROR, INFO, TRACE, and WARN. 


What does scatter-gather return?

A scatter-gather returns a Mule event.


What is the use of Async scope?

Async scope can be used to trigger flows subflows or any components asynchronously from a parent flow. Async scope is very helpful while using logger component or parallel processing requires.


What is the difference between map and mapObject?

map operator is used for array. It takes an array as input and returns an array.

mapObject operator is used for object with key: value pairs. It takes an object as input and returns an object.


map invokes lambda with two parameters: value and index from the input array. 

Example:

%dw 2.0
output application/json
---
["apple", "orange", "banana"] map (value, index) -> { 
    (index) : value}

Output:

[ { "0": "apple" }, { "1": "orange" }, { "2": "banana" } ]


mapObject invokes lambda with keyvalue, or index for mapping given object.

Example:

%dw 2.0
output application/json
---
{"chandler":"bing","monica":"geller"} mapObject (value,key,index) -> { 
    (index) : { (value):key} }

Output:

{ "0": { "bing": "chandler" }, "1": { "geller": "monica" } }


What is batch processing?

Mule allows you to handle large quantities of data in batches. 

This is achieved using a Batch job scope which splits messages into individual records, performs actions on records, and reports the results. A Batch job scope processes data asynchronously.


Each batch job contains three different Processing Phases:  

1. Load and Dispatch: In this phase, Mule splits the message, creates a Batch Job Instance, a persistent queue and associates it with the Batch Job Instance.

2. Process: This phase does the actual processing of records asynchronously. 

3. On Complete: This is an optional phase where you can configure the runtime to create a report or summary of records. 


Stay tuned for more!


Read More »

October 16, 2019

Mulesoft Basics

Mule Application Building Blocks

In this article we will find the basic concepts before start building Mule application using Anypoint studio. Here we will see things about


  • Mule Palette
  • Project explorer
  • Pom basic configuration
  • Shortcuts
  • Selecting runtimes
  • Munits coverage view
  • Test your application and many more.
Mule application building blocks are separated into categories in the Mule 3 Palette:
Anypoint Studio Palette


In Mule 4 build concept is almost same but in Mule 4 runtime decoupled the extra libraries from core runtime libraries and providing only the core libraries to build basic app flows, which makes it lightweight runtime. However we can add modules or import from exchange as per requirement.

batchflow control
Componentsscheduler

error handling

transformers
scopes


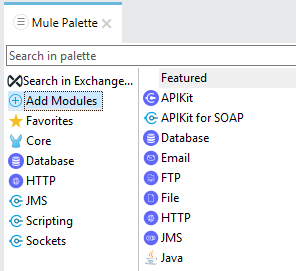
Add modules in Mule 4

Mule 4 Palette


Search from Exchange and Add in Mule 4

Search from Exchange Mule 4


Now lets discuss about components

Message Sources :

The first building block of most flows is a receiver that receives new messages and places them in the queue for processing.
  • Message sources are usually Anypoint Connectors.
  • Connectors provide connectivity to external resources, such as:
    • Databases, protocols, or APIs.
    • Standard protocols like HTTP, FTP, SMTP, AMQP.
    • Third-party APIs like Salesforce, Twitter, or MongoDB.

Anypoint Connectors :

  • There are 2 main types:
    • Endpoint-based connectors
    • Operation-based connectors

Endpoint-Based Connectors :

  • Are either inbound or outbound endpoints in a flow.
  • Inbound endpoints serve as a message source for a flow.
  • Outbound endpoints send information to external systems.

Endpoint based connectors


Operation-Based Connectors :

Operation based connector

  • These connectors require the specification of an operation in order to perform.
  • This category includes most connectors not based on a standard communication protocol


Connector vs Endpoint :

  • A connector is a Mule-specific connection to an external resource of any kind.
  • An endpoint is a flow-level element that is configured to receive and/or send messages from and/or to external resources.
  • When you drag a connector from the Mule Palette, an endpoint is created.
  • Connectors and endpoints are global elements.

Creating Mule Applications With Anypoint Studio

Anypoint Studio is an Eclipse-based integration development environment that provides:
  • Two-way editing between graphical and XML views.
  • Visual debugging (EE).
  • A data transformation framework and language (EE).
  • One-click deployment of applications.
  • Templates for common integration patterns (EE).
  • Integration with Maven for continuous build processes.

Sample Flow: Visual

Sample Mule flow design


Anypoint Studio View: 


AnypointStudio view


Running an Application:


Anypoint Studio comes with an embedded Mule runtime to test applications without leaving it.
The console outputs application logs and information:
AnypointStudio Console


Introducing Mule Flows and Message


Mule Flows

Mule applications accept and process messages through a series of message processors plugged together in the flow.
Mule Flow Structure


A typical flow has:

Message Source  - Accepts a message from an external source, triggering the execution of the flow.
Message Processors - Transforms, filters, enrichs, and processes messages.
An application can consist of:
  • A single flow.
  • Multiple flows/subflows connected together to create more complex applications.

Mule Message Structure

You can find more about Mule message structures and events

Anatomy of  a Flow


Mule Message structure


artifacts-json: In Mule 4


Mule artifact.json


Pom.xml: 

Pom file is now required for Mule 4 app build. All mule app in mule4 is packaging as mule-application 

Pom xml

Project Explorer: 

Below Project explorer shows how the structure of Mule 4 App will look like:

Mule Project Structure


Runtime Selection: 


You can select your required runtime by selecting through Run/Debug as configuration
Mule Runtime Configuration


Menu Bar & Shortcuts

AnypointStudio Menu Bar

Quick Access

You can quickly search from Quick Access, it is placed at top right of your anypoint studio.

Anypoint Studio Quick Access


Munit Coverage View

For munit coverage and reports you can run and also view in anypoint studio.

Munit Coverage report


Testing Applications: For testing Mule Application


Some options:
A browser.
A cURL command-line utility.
A browser extension like Postman (for Google Chrome). 
Postman View


Read More »

October 05, 2019

Securing configuration properties in mule

In this article I will show you how to use mule credential vault and how to start securing your properties file using Anypoint Security suite. You will also get to know about the best practices of using secure properties.


Step I: Installing Anypoint Security Suite

Anypoint Enterprise Security is a collection of security features that enforce secure access to information in Mule applications.It helps application developers to develop security solutions as per security requirements, prevent security breaches, and facilitate proper authorized access to data.

You can find how to install Anypoint security suite my another article here
Before starting you should understand how Mule Credentials Vault actually works. you can go through the documentation here

How to Encrypt Properties
1. Create a Mule project in Anypoint Studio.

2. Add maven dependency to project pom.xml


<dependency>

<groupId>com.mulesoft.modules</groupId>
<artifactId>mule-secure-configuration-property-module</artifactId>
<version>1.0.2</version>
<classifier>mule-plugin</classifier>
</dependency>
3. In the src/main/resources folder of the project, right-click and select New -> File.


Anypoint, Configuration, dataweave 2, Decryption, Encryption, Integration, Maven, Middleware, Mule, Mule 3, Mule 4, MuleCode, MuleProject, MuleSoft, Properties, Tutorial, Mule Credentials Vault, Maven, secure, Security,

4. In the New file wizard, provide a file name, which should include .properties extension. Ex: dev.secure.properties. Click finish.
5. In the project explorer, right-click the .properties file and select Open with -> Mule Properties Editor.
Anypoint, Configuration, dataweave 2, Decryption, Encryption, Integration, Maven, Middleware, Mule, Mule 3, Mule 4, MuleCode, MuleProject, MuleSoft, Properties, Tutorial, Mule Credentials Vault, Maven, secure, Security,

6. Click on the green + icon in the studio. In the Add New Property window, add a key and a value. Click on Encrypt button if you want to encrypt the value, and do not if you don't want to. 
Anypoint, Configuration, dataweave 2, Decryption, Encryption, Integration, Maven, Middleware, Mule, Mule 3, Mule 4, MuleCode, MuleProject, MuleSoft, Properties, Tutorial, Mule Credentials Vault, Maven, secure, Security,

7. If you click on Encrypt, in the Setup encryption information dialog box that appears, select an algorithm and provide a key that will be used to encrypt the value. Click OK.
Anypoint, Configuration, dataweave 2, Decryption, Encryption, Integration, Maven, Middleware, Mule, Mule 3, Mule 4, MuleCode, MuleProject, MuleSoft, Properties, Tutorial, Mule Credentials Vault, Maven, secure, Security,

8. After you click OK, the encrypted value looks as shown below.
Anypoint, Configuration, dataweave 2, Decryption, Encryption, Integration, Maven, Middleware, Mule, Mule 3, Mule 4, MuleCode, MuleProject, MuleSoft, Properties, Tutorial, Mule Credentials Vault, Maven, secure, Security,

8. Repeat the above steps to add more values to the Credentials Vault.

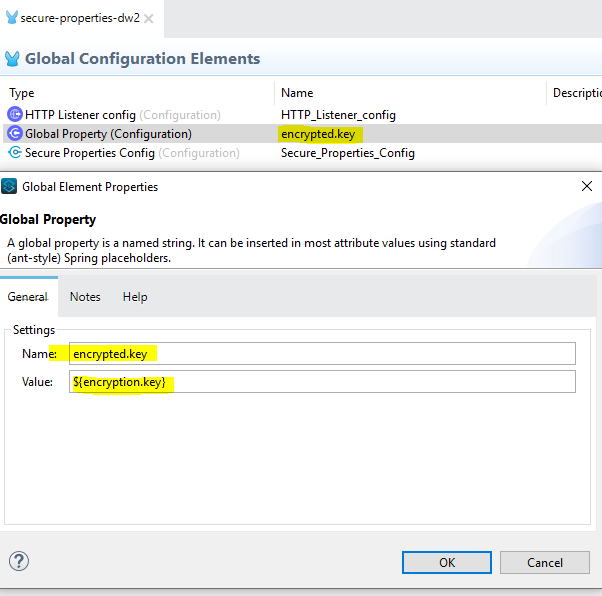
1. Click on the Global Elements tab. Create a global property ${encrypted.key}. This will be provided to secure property place holder. ${encryption.key} is the key that we will provide at runtime of the application.


Anypoint, Configuration, dataweave 2, Decryption, Encryption, Integration, Maven, Middleware, Mule, Mule 3, Mule 4, MuleCode, MuleProject, MuleSoft, Properties, Tutorial, Mule Credentials Vault, Maven, secure, Security,

2. In the Secure Property Placeholder wizard, set the Encryption Algorithm, Encryption Mode, and key. The Encryption Algorithm will be the same as you used at the time of the encryption process above. The key will be the value that you used to encrypt your value above (STEP 6).


Anypoint, Configuration, dataweave 2, Decryption, Encryption, Integration, Maven, Middleware, Mule, Mule 3, Mule 4, MuleCode, MuleProject, MuleSoft, Properties, Tutorial, Mule Credentials Vault, Maven, secure, Security,

Here, ${encrypted.key} is provided through global property. 

Local Setup for running your application

1. Click on the project--> Run as --> Run Configuration
Anypoint, Configuration, dataweave 2, Decryption, Encryption, Integration, Maven, Middleware, Mule, Mule 3, Mule 4, MuleCode, MuleProject, MuleSoft, Properties, Tutorial, Mule Credentials Vault, Maven, secure, Security,

1234 above is my key. You need to add your encryption key in runtime arguments here as shown above.


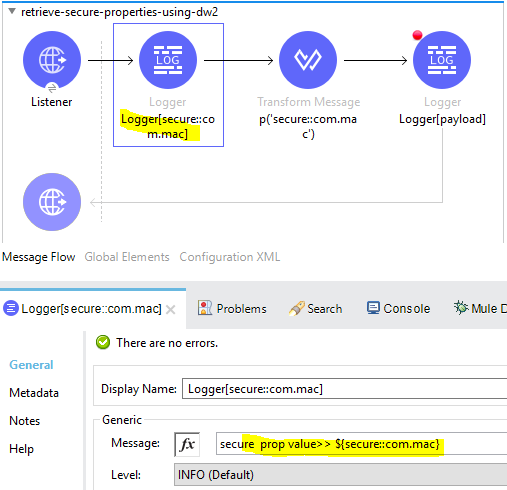
2. After you run this application, call the following flow and look at the console. You will see that the encrypted value is getting printed after decryption.
INFO  2019-10-02 12:33:17,486 [[MuleRuntime].cpuLight.08: [retrieve-secure-properties-using-dw2].retrieve-secure-properties-using-dw2.CPU_LITE @17e305df] [event: b5c46681-e4e2-11e9-a182-e6a471bf06f3] org.mule.runtime.core.internal.processor.LoggerMessageProcessor: secure  prop value>> Hello Manish

INFO  2019-10-02 12:33:22,768 [[MuleRuntime].cpuIntensive.02: [retrieve-secure-properties-using-dw2].retrieve-secure-properties-using-dw2.CPU_INTENSIVE @51ad86c5] [event: b5c46681-e4e2-11e9-a182-e6a471bf06f3] org.mule.runtime.core.internal.processor.LoggerMessageProcessor: "secure  prop value>>" {password=*****}


Anypoint, Configuration, dataweave 2, Decryption, Encryption, Integration, Maven, Middleware, Mule, Mule 3, Mule 4, MuleCode, MuleProject, MuleSoft, Properties, Tutorial, Mule Credentials Vault, Maven, secure, Security,
Logging secure properties


Anypoint, Configuration, dataweave 2, Decryption, Encryption, Integration, Maven, Middleware, Mule, Mule 3, Mule 4, MuleCode, MuleProject, MuleSoft, Properties, Tutorial, Mule Credentials Vault, Maven, secure, Security,
Logging secure prop as payload

To build your application through command line

Anypoint, Configuration, dataweave 2, Decryption, Encryption, Integration, Maven, Middleware, Mule, Mule 3, Mule 4, MuleCode, MuleProject, MuleSoft, Properties, Tutorial, Mule Credentials Vault, Maven, secure, Security,

Note:


  • It is recommended to never log your secure prop values.
  • Always externalize your secure properties.
  • In cloud deployment you can pass secure properties like encryption key in properties editor tab.


Please find the sample Mule project here

Read More »