Adsense

October 06, 2019

@Future vs Batch Apex in salesforce

Future Annotation: 
  1. Future Annotation(@Future) is used to separate methods that are to be executed asynchronously.
  2. If Future Annotation is not used in a web service callout, the thread will wait until the response comes and other processes will not be executed.
  3. Mixed DML Exception can be avoided with the use of @future annotation.
  4. @future annotation - Must be static and return void - Specify (callout=true) to allow callouts.
  5. Parameters passed to this can only be primitive.
  6. Tracking future is difficult as you don't have any jobId to track it.
  7. Future can be used to resolve mixed DML exception.
Example: You cannot insert a setup object and a non-setup object in same context. You'll encounter mixed DML exception. @Future comes for rescue in this situation.
public class MixedDMLFuture {
    public static void useFutureMethod() { 
        //First DML operation- Insertion of non-setup object(Account)
        Account a = new Account(Name='Vydehi Hospital'); 
        insert a; 
        
        // This next operation (insert a user with a role)  can't be mixed with the previous insert unless it is within a future method. 
        /*// Other DML Operation -- commented the code with a reason, if you use the commented code you will get mixed DML exception error
        Profile p = [SELECT Id FROM Profile WHERE Name='Standard User']; 
        UserRole r = [SELECT Id FROM UserRole WHERE Name='COO']; 
        // Create new user with a non-null user role ID 
        User u = new User(alias = 'ranvk', email='dummyMail@gmail',                   
                          emailencodingkey='UTF-8', lastname='niru',languagelocalekey='en_US',     
                          localesidkey='en_US', profileid = p.Id, userroleid = r.Id,  
                          timezonesidkey='America/Los_Angeles',  
                          username='dM@gmail.com'); 
        insert u; */
        //Call future method to insert a user(setup object) with a role. 
        UtilClass.insertUserWithRole( 'dummyMail@gmail.com', 'ranvk', 'dM@gmail.com', 'niru'); 
    } 
}

public class UtilClass { 
      @future 
       public static void insertUserWithRole(String uname, String al, String em, String lname) { 
               Profile p = [SELECT Id FROM Profile WHERE Name='Standard User']; 
               UserRole r = [SELECT Id FROM UserRole WHERE Name='COO']; 
               // Create new user with a non-null user role ID 
               User u = new User(alias = al, email=em, emailencodingkey='UTF-8',   
                              lastname=lname, languagelocalekey='en_US', localesidkey='en_US', 
                              profileid = p.Id, userroleid = r.Id, timezonesidkey='America/Los_Angeles',  
                              username=uname); 
               insert u; 
       } 
}


Batch Apex:
  1. Batch Apex is used to separate tasks that are going to handle more records(complex long running jobs) in background process. 
  2. To avoid hitting governor limits we use Batch Apex for handling bulk records.
  3. It can process up to 50 million records. It can also be scheduled to run at a particular time.
  4. Only 5 concurrent batch can execute simultaneously. It is difficult to track the progress of the execution.
  5. We cannot use @future annotation. As asynchronous call is not allowed from batch apex.


Example: Delete all the account having Rating 'Cold'
global class deleteAccounts implements Database.Batchable{
global Database.QueryLocator start(Database.BatchableContext BC){
string query = 'select id,name,Rating,Owner from Account';
return Database.getQueryLocator(query);
}

global void execute(Database.BatchableContext BC,List scope){
List <Account> lstAccount = new list<Account>();
for(Sobject s : scope){
Account a = new Account();
if(s.Rating=='Cold'){
lstAccount.add(a);
}
}
Delete lstAccount;
}

global void finish(Database.BatchableContext BC){
//Send an email to the User after your batch completes
Messaging.SingleEmailMessage mail = new Messaging.SingleEmailMessage();
String[] toAddresses = new String[] {'dummyemail@gmail.com'};
mail.setToAddresses(toAddresses);
mail.setSubject('Apex Batch Job is completed');
mail.setPlainTextBody('The batch Apex job processed ');
Messaging.sendEmail(new Messaging.SingleEmailMessage[] { mail });
}
}

Read More »

October 05, 2019

Securing configuration properties in mule

In this article I will show you how to use mule credential vault and how to start securing your properties file using Anypoint Security suite. You will also get to know about the best practices of using secure properties.


Step I: Installing Anypoint Security Suite

Anypoint Enterprise Security is a collection of security features that enforce secure access to information in Mule applications.It helps application developers to develop security solutions as per security requirements, prevent security breaches, and facilitate proper authorized access to data.

You can find how to install Anypoint security suite my another article here
Before starting you should understand how Mule Credentials Vault actually works. you can go through the documentation here

How to Encrypt Properties
1. Create a Mule project in Anypoint Studio.

2. Add maven dependency to project pom.xml


<dependency>

<groupId>com.mulesoft.modules</groupId>
<artifactId>mule-secure-configuration-property-module</artifactId>
<version>1.0.2</version>
<classifier>mule-plugin</classifier>
</dependency>
3. In the src/main/resources folder of the project, right-click and select New -> File.


Anypoint, Configuration, dataweave 2, Decryption, Encryption, Integration, Maven, Middleware, Mule, Mule 3, Mule 4, MuleCode, MuleProject, MuleSoft, Properties, Tutorial, Mule Credentials Vault, Maven, secure, Security,

4. In the New file wizard, provide a file name, which should include .properties extension. Ex: dev.secure.properties. Click finish.
5. In the project explorer, right-click the .properties file and select Open with -> Mule Properties Editor.
Anypoint, Configuration, dataweave 2, Decryption, Encryption, Integration, Maven, Middleware, Mule, Mule 3, Mule 4, MuleCode, MuleProject, MuleSoft, Properties, Tutorial, Mule Credentials Vault, Maven, secure, Security,

6. Click on the green + icon in the studio. In the Add New Property window, add a key and a value. Click on Encrypt button if you want to encrypt the value, and do not if you don't want to. 
Anypoint, Configuration, dataweave 2, Decryption, Encryption, Integration, Maven, Middleware, Mule, Mule 3, Mule 4, MuleCode, MuleProject, MuleSoft, Properties, Tutorial, Mule Credentials Vault, Maven, secure, Security,

7. If you click on Encrypt, in the Setup encryption information dialog box that appears, select an algorithm and provide a key that will be used to encrypt the value. Click OK.
Anypoint, Configuration, dataweave 2, Decryption, Encryption, Integration, Maven, Middleware, Mule, Mule 3, Mule 4, MuleCode, MuleProject, MuleSoft, Properties, Tutorial, Mule Credentials Vault, Maven, secure, Security,

8. After you click OK, the encrypted value looks as shown below.
Anypoint, Configuration, dataweave 2, Decryption, Encryption, Integration, Maven, Middleware, Mule, Mule 3, Mule 4, MuleCode, MuleProject, MuleSoft, Properties, Tutorial, Mule Credentials Vault, Maven, secure, Security,

8. Repeat the above steps to add more values to the Credentials Vault.

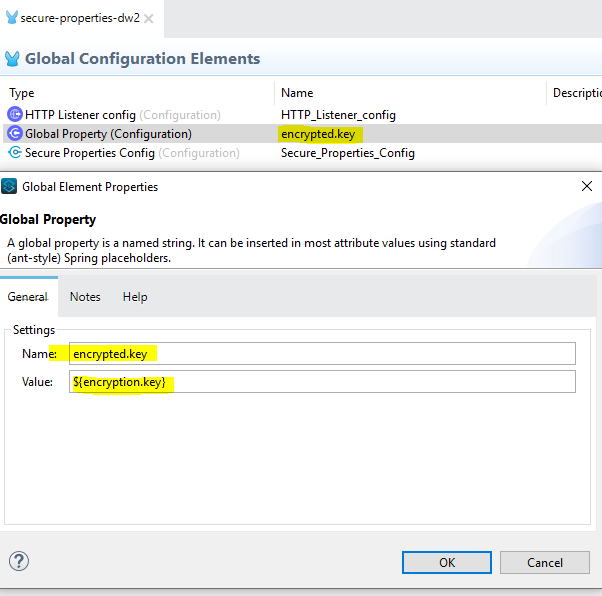
1. Click on the Global Elements tab. Create a global property ${encrypted.key}. This will be provided to secure property place holder. ${encryption.key} is the key that we will provide at runtime of the application.


Anypoint, Configuration, dataweave 2, Decryption, Encryption, Integration, Maven, Middleware, Mule, Mule 3, Mule 4, MuleCode, MuleProject, MuleSoft, Properties, Tutorial, Mule Credentials Vault, Maven, secure, Security,

2. In the Secure Property Placeholder wizard, set the Encryption Algorithm, Encryption Mode, and key. The Encryption Algorithm will be the same as you used at the time of the encryption process above. The key will be the value that you used to encrypt your value above (STEP 6).


Anypoint, Configuration, dataweave 2, Decryption, Encryption, Integration, Maven, Middleware, Mule, Mule 3, Mule 4, MuleCode, MuleProject, MuleSoft, Properties, Tutorial, Mule Credentials Vault, Maven, secure, Security,

Here, ${encrypted.key} is provided through global property. 

Local Setup for running your application

1. Click on the project--> Run as --> Run Configuration
Anypoint, Configuration, dataweave 2, Decryption, Encryption, Integration, Maven, Middleware, Mule, Mule 3, Mule 4, MuleCode, MuleProject, MuleSoft, Properties, Tutorial, Mule Credentials Vault, Maven, secure, Security,

1234 above is my key. You need to add your encryption key in runtime arguments here as shown above.


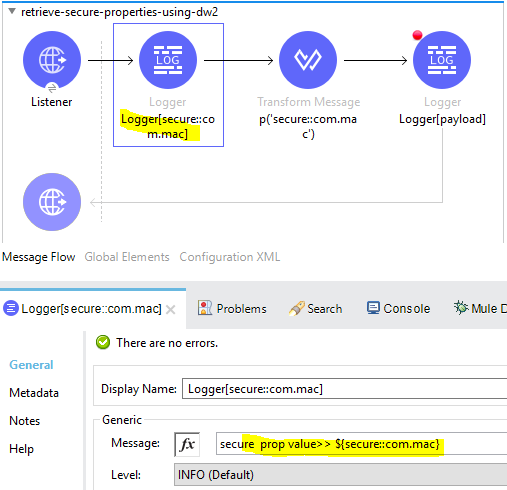
2. After you run this application, call the following flow and look at the console. You will see that the encrypted value is getting printed after decryption.
INFO  2019-10-02 12:33:17,486 [[MuleRuntime].cpuLight.08: [retrieve-secure-properties-using-dw2].retrieve-secure-properties-using-dw2.CPU_LITE @17e305df] [event: b5c46681-e4e2-11e9-a182-e6a471bf06f3] org.mule.runtime.core.internal.processor.LoggerMessageProcessor: secure  prop value>> Hello Manish

INFO  2019-10-02 12:33:22,768 [[MuleRuntime].cpuIntensive.02: [retrieve-secure-properties-using-dw2].retrieve-secure-properties-using-dw2.CPU_INTENSIVE @51ad86c5] [event: b5c46681-e4e2-11e9-a182-e6a471bf06f3] org.mule.runtime.core.internal.processor.LoggerMessageProcessor: "secure  prop value>>" {password=*****}


Anypoint, Configuration, dataweave 2, Decryption, Encryption, Integration, Maven, Middleware, Mule, Mule 3, Mule 4, MuleCode, MuleProject, MuleSoft, Properties, Tutorial, Mule Credentials Vault, Maven, secure, Security,
Logging secure properties


Anypoint, Configuration, dataweave 2, Decryption, Encryption, Integration, Maven, Middleware, Mule, Mule 3, Mule 4, MuleCode, MuleProject, MuleSoft, Properties, Tutorial, Mule Credentials Vault, Maven, secure, Security,
Logging secure prop as payload

To build your application through command line

Anypoint, Configuration, dataweave 2, Decryption, Encryption, Integration, Maven, Middleware, Mule, Mule 3, Mule 4, MuleCode, MuleProject, MuleSoft, Properties, Tutorial, Mule Credentials Vault, Maven, secure, Security,

Note:


  • It is recommended to never log your secure prop values.
  • Always externalize your secure properties.
  • In cloud deployment you can pass secure properties like encryption key in properties editor tab.


Please find the sample Mule project here

Read More »

October 03, 2019

Install Anypoint Security Suite

Goal: In this article we will see how to install Anypoint security suite through AnypointStudio and we will get to know what we can achieve after installing this security suite. This feature doesn't comes with AnypointStudio downloaded version.

Anypoint Enterprise Security is a collection of security features that enforce secure access to information in Mule applications. 


Anypoint Enterprise Security suite helps application developers to develop security solutions as per security requirements, prevent security breaches and facilitate authorized access to data. The following security features bridge gaps between trust boundaries in applications:


  • Mule Secure Token Service (STS) OAuth 2.0 Provider
  • Mule Credentials Vault
  • Mule Message Encryption Processor
  • Mule Digital Signature Processor
  • Mule Filter Processor
  • Mule CRC32 Processor


Steps to install Anypoint Security Suite


Step 1: Open Anypoint Studio -> Go to Help -> Select Install New Software


Anypoint Install New Software


Step 2: Click the Add button and it will open a window

Provide Name as: Anypoint Enterprise Security


Location as: http://security-update-site-1.4.s3.amazonaws.com


Click OK


Anypoint Available Software


Step 3: Go to the Work With drop down


Now you can see Anypoint Enterprise Security - http://security-update-site-1.4.s3.amazonaws.com in the dropdown list. Select it and select the Premium checkbox -> click Next


Select Available Software Anypoint


Check for available software


Again click Next, accept the ‘terms of license agreement’ and then click Finish.

Anypoint Install review license


Step 4: Restart AnypointStudio.

Now you will be able to use the security features given above.

Happy Learning :)

Read More »

October 01, 2019

How to format dates using DataWeave 2

In this article we will see how to format dates as String in DataWeave 2. This is something generic code which you can use for your date transformations in dataweave 2.

For example, lets say we want the output in the format "yyyy-MM-dd'T'HH:mm:ss.SSS" to "yyyy-MM-dd"


Please find snippet below:

%dw 2.0 
output application/json 
fun format(df: DateTime) = df as String {format: "yyyy-MM-dd"} 
--- 

    CreatedDateTime: format("2019-02-13T13:23:00.120Z")

}

Some sample transformation preview from Anypoint studio:


Anypoint, dataweave, dataweave 2, dwl, Middleware, Mule 4, MuleCode, MuleLab, MuleProject, MuleSoft, Studio, transformation,


Anypoint, dataweave, dataweave 2, dwl, Middleware, Mule 4, MuleCode, MuleLab, MuleProject, MuleSoft, Studio, transformation,


You can check more information about date functions used in dataweave 2 here

Moreover, regarding date patterns when you need to format a Date as a String you using the same Java patterns as for the DateTimeFormatterBuilder 


Please find the sample Mule project here


Read More »

September 29, 2019

Salesforce - Test Class Best Practice

Before we talk on best practices we should be following while writing a test class, let's discuss what a test class is and why it is needed.
Test class in Salesforce is a kind of framework which provides you a platform to supply data to your apex class and see how your apex is behaving. 
It is needed as testing is an important part of SDLC. So, before deploying your code to production environment, Salesforce requires at least 75% of your code to be covered by your test classes to make sure that your code doesn't break in any situation in Production.

We should be following below points while writing test class:


  1. Use @isTest at the Top for all the test classes.
  2. Always put assert statements for negative and positive tests.
  3. Use the @testSetup method to insert the test data into Test class that will flow all over the test class.
  4. Always use Test.startTest() and Test.stopTest() doing this it will increase the governor limit of Salesforce. We also use this to increase the governor limit.
  5. Use System.runAs() method to test the functionality in user Context.
  6. Do not put (seeAllData = true) in test class otherwise, use it for exceptional cases.
  7. Avoid Using Hard Coding Ids anywhere in test Class or any apex class.
  8. Please make sure that each class has minimum 75% coverage and also the main functionality has been covered. Target 100% code coverage.
  9. All class method must be tested for at least 20 records and keep the real scenarios in mind.
  10. Use the ORDER BY keywords to ensure that the records are returned in the expected order. 

Best Practices for Parallel Test Execution


Tests that are started from the Salesforce user interface (including the Developer Console) run in parallel. Parallel test execution can speed up test run time. Sometimes, parallel test execution results in data contention issues and UNABLE_TO_LOCK_ROW error occur.
When a deadlock occurs in tests that are running in parallel and that try to create records with duplicate index field values. A deadlock occurs when two running tests are waiting for each other to roll back data. Such a wait can happen if two tests insert records with the same unique index field values in different orders.

This can be prevented by turning off parallel test execution in the Salesforce user interface:

  1. From Setup, enter Apex Test.
  2. Click Options...
  3. In the Apex Test Execution Options dialog, select Disable Parallel Apex Testing and then click OK.
Apex test execution option


Test classes annotated with IsTest(isParallel=true) indicate that the test class can run concurrently with more than the default number of concurrent test classes. This annotation overrides default settings.
Read More »