Adsense

October 31, 2019

Running MUnit for single file flow and Tags-Mule4

In this Article we will see how to run single munit at a time through command line and from Anypoint studio.

Also we will see how to run MUnits using Tags from command line


Execute from Command Line

Using "mvn test" at the terminal will test all MUnit tests, but here we describe how to test only one MUnit file

Run the following command at the project root folder.


In the following example, the MUnit test file is called run-single-munit-test-suite.xml


mvn clean test -Dmunit.test=run-single-munit-test-suite.xml


Running Single MUnit test case

XML file contains several tests, you may add the test name like this:

mvn clean test -Dmunit.test=abc.xml#testName

mvn clean test -Dmunit.test=mvn clean test -Dmunit.test=run-single-munit-test-suite.xml#run-single-munit-test-suite-run-single-munitFlowTest
  
In this case, the "testName" is the name of the test to be executed.


Execute from AnypointStudio

Right click in Munit file --> Run MUnit suite
Run MUnit suite


Right click on test Name--> Run MUnit test
Run MUnit test


Running Munit using Tags CommandLine

Tags are important to categorize the MUnits that needs to be executed based on the requirement. It is more like developer friendly to execute the different test scenarios.

Munit Tags

mvn clean test -Dmunit.tags=flow

Above command will run all the munit tests tagged as name "flow"

You can also use combination as below:

mvn clean test -Dmunit.test=run-single-munit-test-suite.xml -Dmunit.tags=flow

Please find sample Mule project in Github run-single-munit-Mule4

Happy learning :)

Read More »

October 26, 2019

Munit Issue with Async block inside subflow Mule4 - Resolved

In this article We will see the issue related while running Munit with Async block inside sub-flows. We will also see why this error normally occurs while running Munit and what are the options to resolve it.

java.lang.IllegalStateException: Couldn't register an instance of a MessageProcessorChain
at org.mule.runtime.config.internal.LazyMuleArtifactContext.lambda$createBeans$20(LazyMuleArtifactContext.java:399)
at java.util.ArrayList.forEach(ArrayList.java:1257)
at org.mule.runtime.config.internal.LazyMuleArtifactContext.createBeans(LazyMuleArtifactContext.java:386)
Caused by: org.mule.runtime.core.privileged.registry.RegistrationException: Could not register object for key mule-munit-async-subflow-issueSub_Flow@729342238
Caused by: org.mule.runtime.api.lifecycle.LifecycleException: Failed to invoke lifecycle phase "start" on object: SubFlowMessageProcessorChain 'mule-munit-async-subflow-issueSub_Flow' 
  com.mulesoft.mule.runtime.core.internal.processor.TransformMessageProcessor@534ae04a, 
  org.mule.runtime.core.internal.processor.AsyncDelegateMessageProcessor@41cc2f00
]
Caused by: java.lang.NullPointerException
at org.mule.runtime.core.internal.component.ComponentUtils.getFromAnnotatedObject(ComponentUtils.java:37)

Problem Analysis:

As we know sub-flow is synchronous and single threaded in nature. Also Async block every time creates a new thread from running thread to complete the tasks in Async mode. So, in sub-flow scope it should never allow to create a separate thread from the running thread.

async,subflow

Resolution:

Method I: Change sub-flow to private flow
By changing the sub-flow to private flow, you can resolves this issue. As flow supports multi thread execution. So when Async block will called a new thread will be created and registered to its main thread and finishes its execution in Async mode.

async,flow


Method II: Add Try scope on Async scope

Second method is to add Try block on top of Async block to make the execution transactional or running in single thread. So when Munit starts running it will execute and finish its tasks without any issue. 
 async, try, subflow

Which one to choose?

It all depends on your requirement and design. Normally adding try block in sub-flows is a better option if you don't want to change your existing design.


Happy Learning :)
Read More »

October 25, 2019

Exclude flows/files from MUnit coverage


In MuleSoft development before deploying our Mule applications and APIs we write test cases for unit and integration testing. 

MUnit is a Mule testing framework that lets you easily automate testing Mule applications, using both unit and integration tests. MUnit also provides a set of tools, such as a message processor mocking framework that lets you test units of code in actual isolation. 
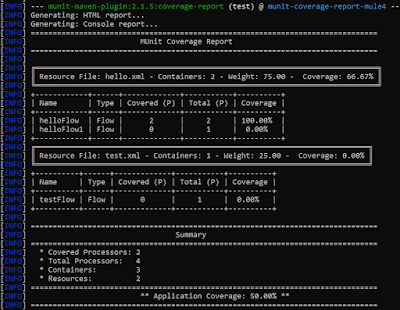
It helps us to generate coverage reports automatically.

In some of the scenarios if you want to skip flows and files from the coverage reports.
The procedure varies slightly depending on the type of test that you are trying to skip in the coverage report.

Ignoring Flows: 

If you are trying to ignore a flow, you can add the following piece of code in the POM file:


<coverage>
  <ignoreFlows>
      <ignoreFlow>flow-name</ignoreFlow>
  </ignoreFlows>
</coverage>


Ignoring File:

If you want to remove a file from your Coverage report, you can add the following piece of code in the POM file:

<coverage> 
     <ignoreFiles>
          <ignoreFile>file-name.xml</ignoreFile> 
     </ignoreFiles> 
</coverage>


Note: 

Please keep in mind that the coverage tag must be included in the Mule Maven plugin configuration tag. For example:

<plugins>
  <plugin>
    <groupId>com.mulesoft.munit.tools</groupId>
    <artifactId>munit-maven-plugin</artifactId>
    <configuration>
      ...
      <coverage>
       ...
      </coverage>
      ...
    </configuration>
  </plugin>
</plugins>


The steps mentioned in this article are only useful for terminal console.


Coverage report with ignore tags: mvn clean install


Coverage report with ignore tags


Coverage report without ignore tags: mvn clean install

Coverage report without ignore tags


Ignore MUnit from command line

mvn clean package -DskipTests

or 

you can add skip test configuration inside pom as below:
<plugins>
  <plugin>
      <groupId>com.mulesoft.munit.tools</groupId>
      <artifactId>munit-maven-plugin</artifactId>
      <configuration>
      ...
      <skipMunitTests>true</skipMunitTests>
      ...
    </configuration>
  </plugin>
</plugins>


Please find sample Mule project in Github Munit coverage report mule4

Happy learning :)
Read More »

October 16, 2019

Mulesoft Basics

Mule Application Building Blocks

In this article we will find the basic concepts before start building Mule application using Anypoint studio. Here we will see things about


  • Mule Palette
  • Project explorer
  • Pom basic configuration
  • Shortcuts
  • Selecting runtimes
  • Munits coverage view
  • Test your application and many more.
Mule application building blocks are separated into categories in the Mule 3 Palette:
Anypoint Studio Palette


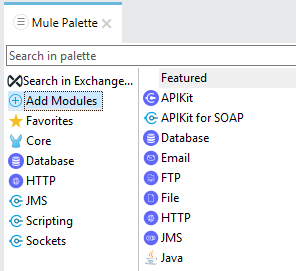
In Mule 4 build concept is almost same but in Mule 4 runtime decoupled the extra libraries from core runtime libraries and providing only the core libraries to build basic app flows, which makes it lightweight runtime. However we can add modules or import from exchange as per requirement.

batchflow control
Componentsscheduler

error handling

transformers
scopes


Add modules in Mule 4

Mule 4 Palette


Search from Exchange and Add in Mule 4

Search from Exchange Mule 4


Now lets discuss about components

Message Sources :

The first building block of most flows is a receiver that receives new messages and places them in the queue for processing.
  • Message sources are usually Anypoint Connectors.
  • Connectors provide connectivity to external resources, such as:
    • Databases, protocols, or APIs.
    • Standard protocols like HTTP, FTP, SMTP, AMQP.
    • Third-party APIs like Salesforce, Twitter, or MongoDB.

Anypoint Connectors :

  • There are 2 main types:
    • Endpoint-based connectors
    • Operation-based connectors

Endpoint-Based Connectors :

  • Are either inbound or outbound endpoints in a flow.
  • Inbound endpoints serve as a message source for a flow.
  • Outbound endpoints send information to external systems.

Endpoint based connectors


Operation-Based Connectors :

Operation based connector

  • These connectors require the specification of an operation in order to perform.
  • This category includes most connectors not based on a standard communication protocol


Connector vs Endpoint :

  • A connector is a Mule-specific connection to an external resource of any kind.
  • An endpoint is a flow-level element that is configured to receive and/or send messages from and/or to external resources.
  • When you drag a connector from the Mule Palette, an endpoint is created.
  • Connectors and endpoints are global elements.

Creating Mule Applications With Anypoint Studio

Anypoint Studio is an Eclipse-based integration development environment that provides:
  • Two-way editing between graphical and XML views.
  • Visual debugging (EE).
  • A data transformation framework and language (EE).
  • One-click deployment of applications.
  • Templates for common integration patterns (EE).
  • Integration with Maven for continuous build processes.

Sample Flow: Visual

Sample Mule flow design


Anypoint Studio View: 


AnypointStudio view


Running an Application:


Anypoint Studio comes with an embedded Mule runtime to test applications without leaving it.
The console outputs application logs and information:
AnypointStudio Console


Introducing Mule Flows and Message


Mule Flows

Mule applications accept and process messages through a series of message processors plugged together in the flow.
Mule Flow Structure


A typical flow has:

Message Source  - Accepts a message from an external source, triggering the execution of the flow.
Message Processors - Transforms, filters, enrichs, and processes messages.
An application can consist of:
  • A single flow.
  • Multiple flows/subflows connected together to create more complex applications.

Mule Message Structure

You can find more about Mule message structures and events

Anatomy of  a Flow


Mule Message structure


artifacts-json: In Mule 4


Mule artifact.json


Pom.xml: 

Pom file is now required for Mule 4 app build. All mule app in mule4 is packaging as mule-application 

Pom xml

Project Explorer: 

Below Project explorer shows how the structure of Mule 4 App will look like:

Mule Project Structure


Runtime Selection: 


You can select your required runtime by selecting through Run/Debug as configuration
Mule Runtime Configuration


Menu Bar & Shortcuts

AnypointStudio Menu Bar

Quick Access

You can quickly search from Quick Access, it is placed at top right of your anypoint studio.

Anypoint Studio Quick Access


Munit Coverage View

For munit coverage and reports you can run and also view in anypoint studio.

Munit Coverage report


Testing Applications: For testing Mule Application


Some options:
A browser.
A cURL command-line utility.
A browser extension like Postman (for Google Chrome). 
Postman View


Read More »

October 10, 2019

Use secure properties in dataweave 2

We have seen In Mule 4 Secure Configuration Properties Module that can be used to encrypt properties files or individual properties. In this article, we will see how to use Secure properties inside DataWeave 2 or in Mule 4 expression statements.

Things to know: If you need to see how to configure your Mule project to use the Secure Configuration Properties Module, and Encrypt Properties, I recommend you read the my article securing-configuration-properties-in-mule.


Once you have Secure Properties configured, you can read secure properties inside your xml configuration by prefixing secure:: namespace before the property name.


Use of secure prop in global property: 

<global-property name="prop" value="my-${secure::property.key}"/>


Use of Secure prop in Flow

<flow name="test-flow">
    <set-payload value="${secure::encrypted.key}"/>
</flow>

Now, What about using it in DataWeave 2?


If you have used properties in DataWeave 1, you would know about a special function p(prop_name) that can be used inside DataWeave 1 script to read properties. The same function is available in Mule 4 and DataWeave 2.


Using in Expression:

<global-property name="prop" value="#[p('secure::encrypted.key')]"/>

Using in DataWeave 2.0:

%dw 2.0
output application/java
---
{
password: p('secure::encrypted.key')
}

Please find the sample Mule project in Github here


Happy learning :)
Read More »